Introduction
I recently experienced that thrill again when I embarked on a project that took me back to my roots when I was younger and full of enthusiasm, exploring Linux and computer security with friends.
The project was simple in theory but rich in learning: I wanted to create a Reverse SSH Proxy to expose a specific service within my Local Area Network (LAN) to the public internet. The goal? To allow anyone to access a local IP:port, such as a camera located at 192.168.1.100:554, through an external address like cloudwebsite.azure.com:554, even if it’s behind a firewall.
The Adventure Begins: Choosing the Right Tools
My choice of tools started with an Ubuntu Server hosted in the Azure Cloud. Not only did it align with my requirements, but the Azure bash CLI brought back the genuine awe I felt 15+ years ago when I first stepped into the world of Linux. The sleek, powerful interface was both a reminder of the past and a symbol of how far technology has come.
A Trip Down Memory Lane: Working with Nano
Configuring the server took me back to the good old days, working with the Nano text editor to modify the SSH configuration file. It was like meeting an old friend after years. Simple and efficient, Nano played its part perfectly, offering a delightful refresh of my previous experience with text-based editing.

Building the Bridge: Setting up the SSH Server
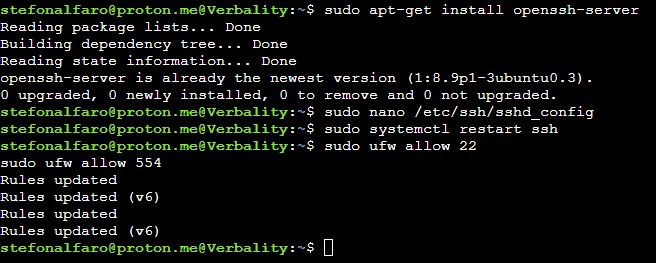
The core of the project was setting up an SSH server that could act as a proxy for any LAN device, making it accessible externally. I was guided by well-trodden paths, yet every command executed and every configuration change made felt like a small victory. Whether it was updating the system, installing the SSH server, or configuring the firewall, each step was a blend of the old and the new, merging memories with fresh insights.
The real magic came when I set up key-based authentication, eliminating the need for passwords and enabling automatic connections. This crucial step transformed my server into a powerful gateway, ready to expose any internal service to an external port.
Conclusion: A Nostalgic Success
The project culminated in a fully functional SSH Server, ready to proxy any LAN device and expose it to the world. The journey was more than just a technical achievement; it was a nostalgic exploration that rekindled the passion and excitement I felt in my early days of tinkering with computers.
In the grand scheme of things, this Reverse SSH Proxy might appear to be just another project. Yet, for me, it stands as a symbol of innovation, exploration, and a timeless love for learning. It’s a testament to the power of technology, not only to connect devices but also to connect us with our past, present, and future.
RTSP Stream via Reverse SSH Tunnel
Overview
This guide explains how to use SSH for creating a reverse tunnel that exposes a local RTSP stream to the public internet. By following this process, you can share an RTSP stream, hosted on your local network, with external users.
Prerequisites
SSH access to a public server (e.g., ssh.stefonalfaro.com).
VLC media player or other RTSP-capable media player.
A local RTSP stream (e.g., rtsp://wnEx1L:[email protected]:554/live/ch0).
Step 1: Generate RSA Key Pair on Windows
Open the Command Prompt or PowerShell.
Run the command to generate an RSA key pair:
bash
ssh-keygen -t rsa
Follow the prompts to create the key pair and save it to the desired location.
Step 2: Copy the Public Key to the Server
Locate the generated public key file (usually ~/.ssh/id_rsa.pub).
Open the file with a text editor and copy its content.
Connect to the public SSH server and edit the ~/.ssh/authorized_keys file.
Paste the copied public key content into a new line in the file.
Save and exit the file.
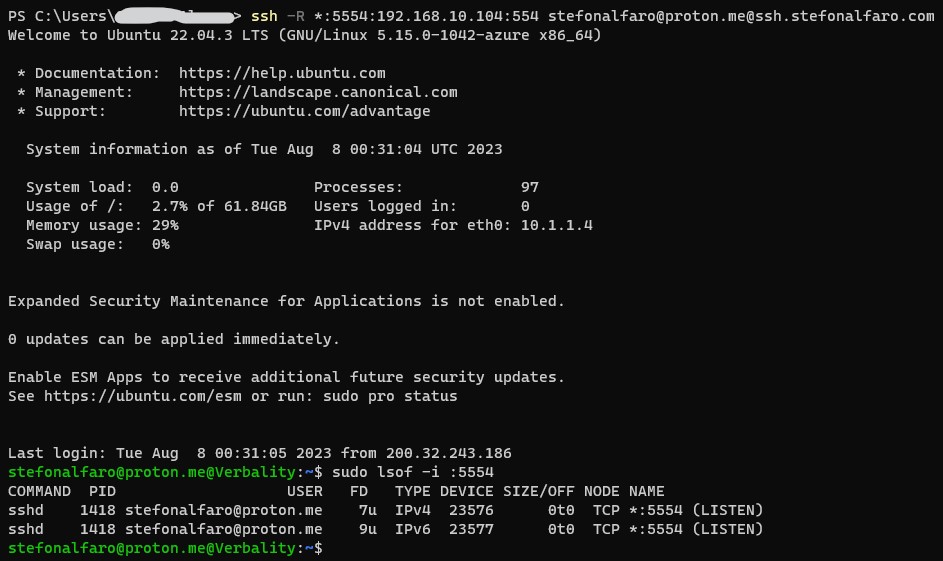
Step 3: Start the Reverse SSH Tunnel
Open the Command Prompt or PowerShell.
Run the following command:
bash
ssh -R *:5554:192.168.10.104:554 [email protected]@ssh.stefonalfaro.com
The RTSP stream is now accessible publicly via:
bash
rtsp://wnEx1L:[email protected]:5554/live/ch0
Step 4: Access the Stream with VLC
Open VLC media player.
Go to Media > Open Network Stream.
Enter the public RTSP URL from Step 3 and click “Play.”
Conclusion
By following these steps, you can share a local RTSP stream with external users through a reverse SSH tunnel. The public server must have GatewayPorts set to “yes” in the SSH configuration file (/etc/ssh/sshd_config) to enable the reverse tunnel.
Remember to replace the local IP address, port number, and public server details with your specific information.
Security Note: Be mindful of security concerns when exposing a local service to the public internet. Use strong authentication and consider implementing additional security measures, such as a VPN or firewall rules.